Verifying Your IR Illuminator: Avoiding Misdiagnosis in Night Vision Issues
A grainy image when using night vision equipment doesn't always mean the device is failing. Often the real problem lies in the infrared (IR) illuminator, how away the object is or what kind of surface you are trying to see. By going through an organized process you can tell the difference, between a focus issue and a lighting issue. This way you avoid making changes that don't help and might even make things worse.
Understanding the Scene Before Equipment
When you have trouble seeing clearly at night the first thing to do is to understand what is actually going wrong. Don't jump to changing settings away. Instead ask yourself some questions. Is the whole image dark?. Is the center clear. The edges blurry? Are nearby objects sharp while distant ones look flat? Sometimes certain details disappear completely against backgrounds like fences or roads. These clues can help you figure out what's really happening.
Environmental factors matter too. Open areas might have light to make images clearer while enclosed woods can stay dark even when its not completely dark outside. Things like mist, dust or shiny surfaces can scatter light which makes the picture look less detailed. Just because something looks bright doesn't mean it gives you detail. A scene can appear bright. Still lack texture or contrast.
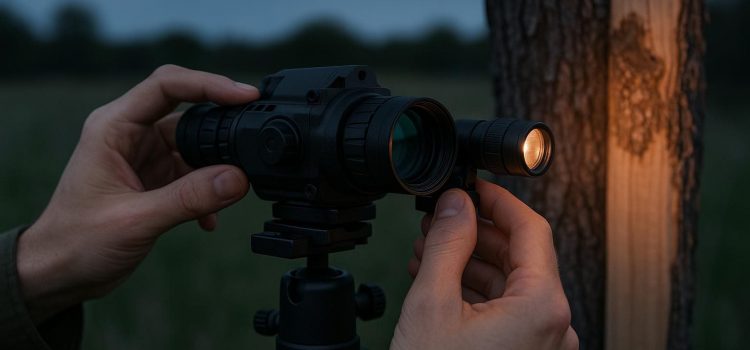
Start by using a test setup. Pick a subject that has both light parts-a tree trunk next to a colored fence works well. This kind of contrast helps you judge performance better than a surface would.
Focus and Distance: The Key Elements
A common mistake is thinking that a poor image is caused by illumination when it's actually a focus problem. If turning up the IR light doesn't make the picture sharper focus on the focus. Adjust the lens and the eyepiece carefully. Make changes, pause and look at fixed edges than just trying to get more brightness.
The best method is to focus on something like an object with high contrast and then shift your gaze to something farther away without moving your gear. If the close object comes into focus but the far one stays blurry the issue could be depth of field, weather or the design of the optics. If neither object comes into focus check whether your eyepiece is set correctly for your eyesight.
Avoid using zoom to try to focus. Zooming in can turn noise into what looks like detail. It really distorts the image. It makes it harder to judge what's going on.
Isolating the Illuminator
To test your IR illuminator properly you have to test it by itself. Turn it off. Look at the scene. Then turn it on at the setting that still works. Don't move your position. Change your angle. If the image gets brighter but you don't see texture the extra light might be causing glare. Just lighting up the background without adding useful detail.
Next check if the illuminator is aligned correctly. The brightest spot should line up with where you're looking. If the beam is high too low or off to the side it can give the impression that the light's weak. This is especially true when using a magnifying optic.
Test under conditions that match your use. A wide beam works for close-up views. May not reach far. A narrow beam can go farther. Stay intense. It may light up unevenly and cause reflections.
Analyzing Brightness vs. Detail
When reviewing your results don't just ask, "Is it brighter?" Instead ask: "Can I see detail without losing contrast?" Look for things like bark patterns, grass blades or the edges of overlapping items. These small features are indicators than a bright but flat image.
Much infrared light can wash out colored objects and cause blooming around shiny parts. It can also make dust, moisture or fingerprints on the lens more visible. Cleaning the lens is important especially when dealing with optics.. Don't assume cleaning fixes everything. If the problem only shows up when the IR is on consider lowering the output adjusting the angle or using a beam.
Sometimes it helps to place the illuminator off-center from the path to avoid reflections bouncing back into the system.. This adds difficulty in setup because alignment becomes critical.
Creating a Verification Checklist
For results write down what you see of depending on memory. Here's a simple checklist to keep things organized:
– Keep the subject, position and distance for each test.
– Test the illuminator with it off and then on at settings.
– Check focus on both nearby and distant objects.
– Make sure the beam is centered on the target.
– Look at detail separately from brightness.
– Note any reflections, fog or moisture that could affect results.
– Check. Connections if there's a drop in output.
– Repeat tests after letting the equipment adjust to outdoor temperatures.
Batteries, condensation and temperature changes can all affect performance. If your results change a lot between tests do the tests again in the conditions.
Interpreting Your Findings
When the IR light improves both brightness and texture it means the light is working well in low-light situations.. If only brightness increases and detail doesn't improve the issue might be surface interaction, focus or contrast. If the image gets worse check for reflections much light or a misaligned beam.
Using a setup-relying on natural light-can give a more real view and avoid drawing attention.. This method depends on having ambient light. Active IR illumination can make dark scenes usable. It uses power and can exaggerate surfaces. Your choice depends on your needs the distance involved and how complicated you want your setup to be.
For those watching wildlife or attending sporting events be aware of your surroundings and local rules. Laws, about lighting protected species and night observation vary by location. Always understand what's allowed before using IR equipment. Ultimately this verification process helps you find out which part of your system-illumination, focus or contrast-is most affecting the quality of the details you see.